Archive | Pasteries RSS feed for this section

A Happy Mother’s Day…

8 May The breakfast table

…begins with a good breakfast.

And this I’m certain about because breakfast is the first meal of the day, the meal that sets up a person’s mood, the meal that has no rules!

Perhaps, I’m bias because I love (lovelovelovelove) breakfast, but hey, Mother’s Day is also known for good breakfasts, cards, flowers, and simply showering mom with love. :)

The Card and Flowers

So for this Mother’s Day, I wanted to get my mom something, but nothing at the stores seemed just right for the occasion. I spent almost 2 hours browsing stores in a mall, walking up and down and to and fro, and talking to sales ladies and chit chatting about ideas. Still nothing.

At Japan Town, I did manage to find a card I liked, but since it was time to go (my ride was here) and the store was at the opposite end of the mall, I decided to go back with my friend Michelle later, which we did and this was the card I bought that perhaps inspired me with the fabulous breakfast idea:

Mother's Day card with white flowers

Cute, right? But notice the burnt toast...I told my mom I'd never burn the toast because 1) Bread/toast is precious 2) It's terrible to eat

So after being inspired by the card, I knew the next thing to do was get flowers. I don’t believe I’ve mentioned it yet and actually come to think of it, I know I haven’t mentioned it yet because I didn’t want to jinx it, BUT I am growing chives and was growing onions. The failed story of the onions was that it attracted some kind of strange bug, which after some research seems to have been aphids (not really sure). These pesky bugs destroyed and killed some of my mom’s plants at home as their leaves turned black/brown and withered away. :( So for Mother’s Day, I knew it had to be a plant and not just a bouquet of flowers.

Getting the plant was tricky since hiding it would be difficult. Yesterday after volunteering, I told my mom I was extending an hour at the senior home so that I could bus my way to Laurel Village to Bryan’s Grocery to buy a plant and ingredients for my breakfast surprise. Luckily even though I missed my first bus, another one came 5 minutes later and I successful got the plant, some organic chives (mine aren’t tall enough yet to cut), and the puff pastry dough. Carrying the Bryan’s bag was easy enough. When my mom picked me up, I simply told her to pop the trunk and there went the bag into another bag. And since we did grocery shopping next (and I carry most of the bags), she didn’t notice the extra bag.

Hiding the plant when I got home was still tricky though. I couldn’t let it suffocate so between my bed and the wall, I placed the plant near the window. Mom never noticed it, but my cat had her nose near it the entire time. I kept trying to shoo her away, but she enjoyed sitting right next to it so often that my mom once said, “Where’s Tiger?” and I looked over and saw her there. I had to close the bedroom door so Tiger wouldn’t give away the surprise.

The Breakfast

After rounding up all my ingredients from Bryan’s, I planned to wake up early on Sunday around 7:30 or so. For once I was glad that Tiger is a pest in the morning. She jumps on top of the bed and sits right next to my face and cries long mournful meows. The cause? Hunger pangs. This time I woke up when she cried, fed her, and got to work in the kitchen by first taking out the puff pastry to let it thaw out.

While the pastry was thawing, I cooked the ground turkey meat with garlic and onions. After this, sliced 2 medium eggplants, and 1/4 of a red bell pepper. I took 5 eggs out of the fridge along with the egg beater container. Then I preheated the oven to 400F.

Since the pastry wasn’t done thawing yet, I prepared the waffle iron (and created lots of noise), tried moving the cookie sheets, cake pans, muffin pans, etc. from where they were to a new location (and created even more noise), and then tried to get the plates from the cabinet (and created even MORE noise because I knocked over the ENTIRE stack of bakeware). Yikes. I thought I woke up Mom but apparently, if I close the dining room door to the hallway and the bedroom is also closed, then I can destroy the whole kitchen and not wake up Mom. :)

Finally, the the pastry was ready, I laid one pastry layer down, spread the turkey as the bottom layer, neatly placed the eggplants and bell peppers on top, sprinkled freshly grated Parmesan cheese and chives, cracked the five eggs (and poked them), and poured 1/2 cup of egg beaters into the 9-inch square cake pan. Finally, I laid the second pastry layer on top, spread an egg wash, and then sprinkled more cheese. Into the oven my creation went for 30 minutes.

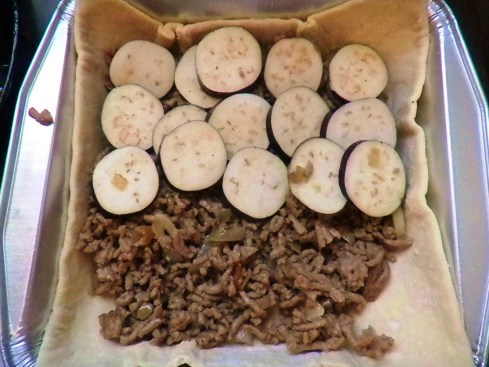
First layers: pastry, turkey, eggplant

Bottom layers: pastry, ground turkey cooked with garlic and onions, and eggplant slices

Upper layers: red bell peppers, 5 eggs, 1/2 cup egg beaters, chopped organic chives, and a sprinkle of parmesan cheese

Upper layers: red bell peppers, 5 eggs, 1/2 cup egg beaters, chopped organic chives, and a sprinkle of parmesan cheese

Waffle time.

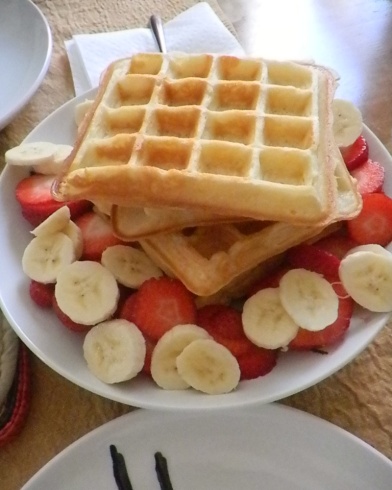
Not wanting to use a mix from a box, I looked up a recipe and then just poured it into the waffle maker. Of course, I couldn’t help but add something to recipe (vanilla extract). While the waffles were cooking, I cut up strawberries and a banana. I was tempted to make a smoothie, but then decided against it.

Vanilla Waffles with strawberries and banana slices

Vanilla Waffles with strawberries and banana slices

Oh, I forgot to mention that while I was at the senior home, they were selling banana walnut cake (which I’ve helped them make before) so I bought that too. So when the waffles were cooking, I cut several slices of the cake and prepared them in the microwave to heat up.

Walnut banana cake slices courtesey of St. Anne's Home

Walnut banana cake slices courtesey of St. Anne's Home. They were deliciously moist and very banana-y.

After some more cooking and prepping, I was ready.

The breakfast table

The breakfast table

Out of everything I made/had available, Mom loved the pastry the best. Here’s the final outcome in case you were curious….

Final layers of Breakfast Puff Pastry

Final layers of Breakfast Puff Pastry

For all you mothers out there and mothers-to-be, Happy Mother’s Day! :)

The Recipes

  1. Ultimate Breakfast Puff Pastry
    *I added slices of 2 eggplants and slices of 1/4 of a red bell pepper
    * I used 1/4 of a package of ground turkey instead of ham; and substituted 1/2 cup of egg beaters for 2 eggs.
  2. Waffles
    *I added 1/4 tsp of vanilla extra.

Mini Shepherd’s Pie Tarts

17 Mar Shepherd's Pie Tarts (golden brown)

Luck o’ the Irish be with you all! Ho ho ho!

Just imagine a big leprechaun saying this.

But either way, I think I just combined two holidays (St. Patrick’s Day and Christmas). Uh, that kind of shows you how much I know about St. Patrick’s Day lingo. And I just found out after I made the mini shepherd’s pies that they aren’t even Irish; they’re English. (I know I’m 1/8th Irish, but hey, I just found out a earlier this year.)

Anyway, if you’ve got nothing better to do, then sit back and enjoy my anecdote and lovely pictures.

For a recipe, please comment below or email me at nell.notebook@yahoo.com

Continue reading

Easter Sunday: Cream Puffs with Lemon-Cream Filling

4 Apr

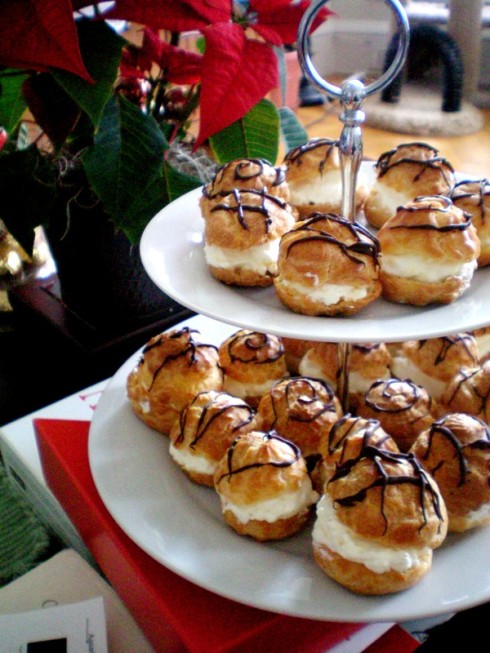
Lemon Cream PuffsI am glad that the cream puffs won the vote because making these has been such a great learning experience.

You might be thinking, “Learning experience? … Doesn’t that mean something went wrong …. ?”

Ah, but not this time. I learned while making these simply because I’ve never made cream puffs before. Sure, I had attended the Sur La Table summer secession last year when the cream puffs were made, but my group was not assigned to make them. All I saw was the delicious-looking (and tasting) result.

So when the vote came in, I now had a reason to bake the cream puffs myself! And not just cream puffs, lemon-cream filling cream puffs! Bon Appetit chose well for their April/Easter issue.

Since I had never made cream puffs before, I read and read and re-read the procedure dozens of times. Strangely enough, I was methodical and did no improvising. Whole milk? Yep. Grated fresh lemon peel? Sure thing. Heavy whipping cream? Got it right here.

And boy, was I happy that I did. The cream puffs turned out beautiful and tasty. I wish I could share the puffs with all of you, but to taste these lemon cream puffs, I guess you’ll have to make them yourselves. For the recipe, please check out my previous post here. (Although, I must mention that the filling didn’t quite fill all the puffs, so I’d recommend making two batches of the lemon filling.)

If, on the other hand, you took on my April Bon Appetit challenge, then I encourage you to leave a comment or email me at nell.notebook@yahoo.com.

Once again, Happy Easter!

Lemon Cream Puffs

Join Me in the April Challenge: Cream Puffs with Lemon-Cream Filling

2 Apr

Well, the vote is in and the Lemon Cream Puffs recipe is the winner! (Thank you all for voting!) I have not made them yet, but I wanted to post the recipe for those who wanted to join me in my Bon Appetit April challenge.

I would have probably made the puffs tonight for dessert, but as I reading over the ingredients, I am lacking whole milk and fresh lemon juice. Since I’m hoping to follow the recipe exactly without substitutions, I can wait until tomorrow afternoon to make them. (“Patience is the key, young grasshopper!” rings way too true right now.)

The Garden Project (a mini digression)

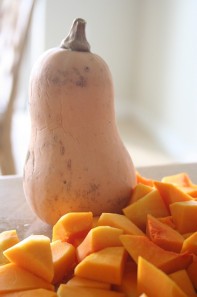
Butternut Squash, courtesy of The Official Body Building BlogAs the sun is setting and its rays light up my living room at the moment, I can’t help but actually soak it all in. I’m done with my homework for the day (with more studying to come next Monday) and I’ve got the wonderful and beautiful Saturday to look forward to tomorrow. The possibilities are endless!

“Why are you so extra cheery?” you might be asking yourself.

Well, because of the fact that I am now officially on Spring Break for a week! I finally have the time to do what I want to do: wake up late(r), watch Rachel Ray on weekdays, bake, visit some friends, and (hopefully) start my vegetable garden!

Ever since I fell in love with Butternut Squash, I’ve been wanting to grow some of my own. Because of the confines of my apartment, I don’t have a lawn, backyard, or any place with potential to nourish a growing seed, I thought I would buy large container and plant the squash there.

With spring here and summer on its way, I figured I could put the container on the top of the apartment complex, like on the roof. I have no idea whether it is legal or not, but I do know that the roof is strong enough – it can support several people. Direct sunlight is important for squash so the roof is a great plus too. If it is illegal, then I guess putting it inside near the window will have to do.

If I do end up planting my squash over break, rest assured that I will update you! I’d be happy to chronicle the happenings of my Apartment Garden. Maybe my experiment with its ups and downs will help you – if you do decide to plant your own vegetables – produce even better produce. If not, you can always simply sit back and read about my adventures.

For more information on growing vegetables in containers, check out the Sloat Garden Center website.

Without further ado, here is the April Challenge:

(Oh, please do not be daunted by the long recipe. I’d love to hear about your adventure in the kitchen while you bake these).

And, if I do not post before then, Happy Easter! :)

Cream Puffs with Lemon-Cream Filling

Courtesy of Sisi Carroll’s recipe in the Bon Appetit April Issue, found here

Ingredients

lemon cream filling

  • 1/2 cup sugar
  • 1 large egg
  • 1/4 cup fresh lemon juice
  • 1 1/2 teaspoons finely grated lemon peel
  • pinch of salt
  • 3 tablespoons unsalted butter, diced
  • 1 cup chilled heavy whipping cream

cream puffs

  • 3/4 cup water
  • 3/4 cup whole milk
  • 3/4 cup (1.5 sticks) unsalted butter, diced
  • 1/2 teaspoon salt
  • 1 1/2 teaspoon salt
  • 1 1/2 cups sifted all-purpose flour (sifted, then measured)
  • 6 large eggs, divided

assembly

  • Robin eggs malted milk candy (optional)
  • 4 ounces high-quality white chocolate (such as Lindt or Perugina), finely chopped

special equipment

  • Pastry bad with 1/2-inch plain round tip

Procedure

Lemon-Cream Filling

  1. Combine sugar, egg, lemon juice, lemon peel, and pinch of salt in heavy small saucepan; whisk to blend. Add butter. Stir constantly over medium-low heat until curd is hot and thick enough to coat spoon (do not boil), 4 to 5 minutes.
  2. Transfer lemon curd to small bowl. Press plastic wrap onto surface; chill until cold and slightly firm, at least 2 hours. This can be made 2 days ahead. Keep chilled.
  3. Transfer chilled lemon curd to medium bowl. Using electric mixer, beat cream in another medium bowl until peaks form. Fold whipped cream into curd in 3 additions. Cover and chill filling 1 hour. This can be made 2 hours ahead. Keep chilled.

Cream Puffs

  1. Position 1 rack in top third and 1 rack in bottom third of oven and preheat to 425 degrees F. Line 2 large rimmed baking sheets with parchment paper.
  2. Bring first 4 ingredients to boil in heavy large saucepan over medium heat, stirring with wooden spoon until butter melts. Add flour all at once and stir vigorously until dough forms and pulls away from sides of pan. Continue to stir until film forms on pan bottom, 1 to 2 minutes longer. Transfer dough to large bowl. Cool 5 minutes, stirred occasionally.
  3. Add 1 egg to dough and beat until blended using wooden spoon. Add remaining 5 eggs, 1 at a time, beating until dough is smooth and shiny, 2 to 3 minutes.
  4. Working in batches transfer dough to pastry bag fitted with 1/2-inch plain round tip. Pipe 1- to 1 1/4-inch mounds, spaced about 2 inches apart, onto prepared baking sheets. Using wet finger, smoother tops of mounds.
  5. Bake puffs 15 minutes. Reverse baking sheets. Reduce oven temperature to 350F. Continue to bake until puffs are dry, firm, and deep golden brown, 30 to 35 minutes longer. Cool puffs on baking sheets.

Assembly

  1. Cut each puff horizontally in half. Pull out any soft dough. Fill puff bottoms with 1 tablespoon lemon-cream filling. Please egg-shaped candy atop filling, if desired. Press on puffs to adhere.
  2. Place white chocolate in medium metal bowl. Set bowl over small saucepan of barely simmering water. Stir until chocolate is soft and almost melted. Remove from over war; stir until completely melted and smooth.
  3. Using a teaspoon, drizzle white chocolate decoratively over each cream puff. Arrange filled puffs on platter. Refrigerate until chocolate glaze sets, at least 15 minutes and up to 3 hours.

Good Morning, New Year 2010! I’ve got Cinnamon Rolls :)

2 Jan

I am not sure how familiar you are with the Filipino tradition – is it really Filipino? I’m not too sure – in which you have to wear anything round and circles on New Year’s Eve, but my mom and I actually follow it. According to the wives’ tale, if you wear circles and surround yourself with your money and anything round especially grapes and eat noodles, then you’ll have luck and wealth the following year. So, us being the slightly superstitious people – not believers of witchcraft or the such, but rather humorous believers – we decided to wear crazy clothes with circles and polka dots, put random money bills in our pockets, ate Taiwanese noodles, and put out a big bowl of grapes on our dinning table.  We were such a sight.

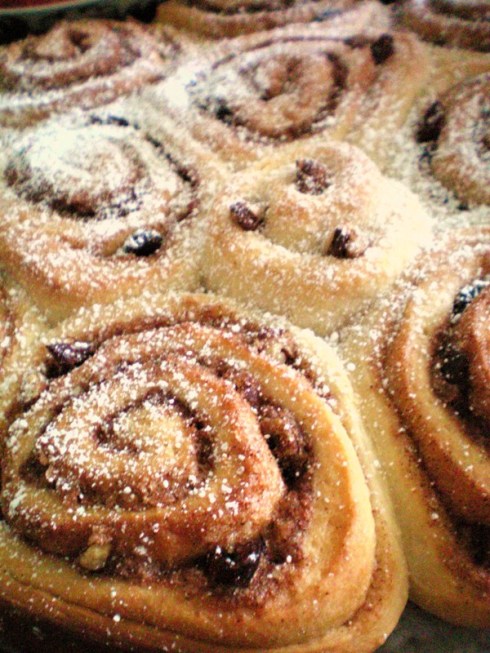
Anyway, I decided last night (New Years Day) to spend sometime with my newest best friends: my beautiful, brand new red KitchenAid Pro 600 and Peter Reinhart’s book Artisan Breads Every Day. (I’ll be writing about the KitchenAid mixer and Peter Reinhart in my next post). Together with my oven being all clean and spic-n-span, I was able to prepare the dough and shape it into cinnamon rolls. Beautiful, ROUND, cinnamon-y, cinnamon rolls! I decided to half the recipe in Reinhart’s book because 24 rolls for my mom and I would have been too much; as it is 12 was too much.

So this morning I baked the cinnamon rolls, and boy did the house smell good. Long gone was the awful cleaning smell from the oven. Nope, what wafted in tickling our noses were the twelve round cinnamon beauties.

They turned out fluffy and perfect tasting, not too much cinnamon with slight (oh, so slight) zing of lemon. I have to admit that I found the lemon extract ingredient to be strange, but it actually made the cinnamon rolls taste better and smell zingier.

Here’s the recipe because I know you’ll want to try it especially for your luck in 2010. :)

Peter Reinhart’s Cinnamon Rolls

Reinhart’s recipe is perfect for people working at home because it calls that you prep the dough the night before, then shape it the next morning, let it rise again, and then bake it. However, I decided to make the dough, let it rise 1 hr in a warm oven, shape it into rolls, and then place them in the fridge to rise again. The next morning I just baked them.

Makes 24 cinnamon rolls


Ingredients

Dough

  • 6 1/4 cups unbleached all-purpose flour
  • 2 teaspoons (tsp) salt, or 1 tsp coarse kosher salt
  • 6 tablespoons (tbl) sugar
  • 5 tbl instant yeast, or 6 1/4 tbl active dry yeast
  • 2 cups plus 2 tbl lukewarm milk, whole or low-fat (about 95 degrees F)
  • 1/2 cup vegetable oil or melted unsalted butter
  • zest of 1 lemon, or 1 tbl lemon extract, or 1/2 tsp lemon oil (optional, but highly suggested)

Cinnamon Sugar Inside

  • 3 tbl ground cinnamon
  • 3/4 cup sugar
  • melted butter or vegetable oil for brushing on dough
  • 1 cup raisins to taste (optional)
  • 1cup chopped walnuts or pecans to taste (optional)

Cream Cheese Topping

  • 4 ounces cream cheese
  • 1/4 cup melted, unsalted butter
  • 1 cup confectioner’s sugar. sifted
  • 1 tsp vanilla extract
  • 1/4 tsp lemon or orange extract, or 1 tbl lemon juice or orange juice
  • pinch of salt

White Fondant Glaze

  • 4 cups confectioners’ sugar, sifted
  • 2 tbl light corn syrup (optional)
  • 1 tsp vanilla, lemon, or orange extract, or 1 tbl orange juice concentrate (optional)
  • 1/2 to 3/4 cup milk or water

Procedure

Dough (Make the night before)

  1. Combine the flour, sugar, and salt in a bowl. Whisk the yeast into the milk until dissolved, about 5 minutes. Then pour yeast and milk mixture into the dry ingredients along with the oil and lemon zest. If using a mixer, use the paddle attachment and mix on lowest speed for 30 seconds to 1 minute. If mixing by hand, use a large spoon and stir for about 1 minute. The dough should form a soft, coarse ball.
  2. Switch to the dough hook and mix on medium-low speed, or continue mixing by hand, for  minutes, adding flour or milk as needed to create a smooth, soft, slightly sticky ball or dough. (Sticky dough is dough that sticks to a dry finger).
  3. Increase the speed to medium and mix for 2 minutes more or continue stirring for about 2 minutes more, until the dough is very soft, supple, and tacky but no longer sticky. (Taacky dough is dough that clings to a dry finger but will not stick to the finger when the finger is pulled away from the dough).
  4. Transfer the dough to a lightly floured work surface and knead for 1 minute, then form it into a ball.
  5. Place the dough in a clean, lightly oiled bowl large enough to hold the dough hen it doubles in size. Cover the bowl tightly with plastic wrap, and refrigerate overnight or for up to 4 days.

On Baking Day

  1. Remove the dough from the refrigerate about 3 hours before you plan to bake. Divide the dough in half and form each piece into a ball. Cover each ball with a bowl or plastic wrap and let rest for 20 minutes.
  2. On a floured work surface, roll each ball of dough into a 12 by 15-inch rectangle, rolling from the center to the corners and then rolling out to the sides. If the dough starts to resis or shrink back, let it rest for 1 minute, then continue rolling. The dough should be between 1/4 and 1/2 inch thick.
  3. Make cinnamon sugar by whisking the cinnamon into the sugar. Brush the surface of the dough with melted butter, ten sprinkle the cinnamon sugar over the surface, leaving a 1/4-inch border. Sprinkle the raisins or chopped nuts over the surface if you like, to taste. Roll up the dough like a rug, rolling from the bottom to the top, to form a tight log.
  4. Cut the log into 1-inch-thick slices and place them on a sheet pan or two round cake pans lined with parchment paper or a silicone mat, placing the rolls about 1 1/2 inches apart; they should touch each other once they rise. Mist the tops with spray oil and cover loosely with plastic wrap, then let rise at room temperature for about 2 hours, until the dough swells noticeably and the buns begin to expand into each other.
  5. About 15 minutes before baking, preheat the oven to 250 degrees F (177 degrees C).
  6. Bake for 10 minutes, then rotate the pan and bake for another 5 to 15 minutes, until the buns are a rich golden brown. Meanwhile, make whichever topping you prefer.
  7. Once the buns are glazed, enjoy!

Cream Cheese Frosting

  1. Combine the cream cheese, butter, and sugar in a mizing bowl. If using a mixer, use the paddle attachment and mix on the lowest speed fr 2 minutes. If mixing by hand, stir vigorously for 2 – 4 minutes. The ingredients should be evenly incorporated and smooth.
  2. Add the vanilla, lemon extract, and salt and mix on medium speed, or continue mixing by hand, for about 1 minute, until the ingredients form a smooth paste. Increase the speed to medium-high speed or stir more vigorously for about 20 seconds to fluff up the glaze. Once the buns have cooled for 5 minutes, use an offset spatula or table knige to spread on however much glaze you’d like. Stored in an airtight container in the refrigerator; any unused glaze will keep for up to 2 weeks.

White Fondant Glaze

  1. Stir the sugar, corn syrup, and vanilla together. Gradually whisk in the mill, adding just enough to make a thick but creamy glaze about the same thickness as pancake batter, adjusting with more liquid or sugar as needed. The thickness of the glaze is really up to you: the stiffer it is, the better it will hold its design; the thinner it is, the more easily it will spread. Ideally, you hould be able to drizzle a slow steady stream off the end of a spoon or other utensil to create designs that will firm up when the buns cool. Glaze the buns after they’ve cooled for about 5 minutes.


Me? I just like it with a bit of dusted sugar, strawberries, and butter. :) Enjoy!