Tag Archives: sur la table

In the Kitchen with Sarah Lodick (Sur La Table)

9 Aug

When I got back from UC Davis, I did not have much planned except for doing homework. How lame, I know.

So by Tuesday night, I had pretty much finished my summer reading assignment to read and respond to online questions regarding the chapter themes of “The Axemaker’s Gift” by Burke and Orstein. Don’t misjudge the book by my unenthusiastic attitude though. It’s a rather interesting take on how technology has changed man’s perspective of the world and how man can get back in touch with his more natural roots. If you’re looking for a serious read, this is a good choice.

Luckily, my mom already had things planned for me for the rest of the week. She had apparently called the Sur La Table in San Francisco Union Square to see if there was still room in the Teen Baking Camp; and luckily for me, there was not only room available but Chef Sarah Lodick was still willing to let me join the class for the rest of the week! Sarah had remembered me from last year and knew that I was not a troublemaker and readily let me join.Sur La Table Kitchen

Monday was apparently “Breakfast Creations” and Tuesday had been “Shortcakes, Cobblers, and Crisps”, but I don’t mind having missed these classes because Sarah gave me the recipes for the savory scones, nectarine and blueberry crisp, cherry almond crisp, (and more!).

Wednesday, “Pies and Tarts”

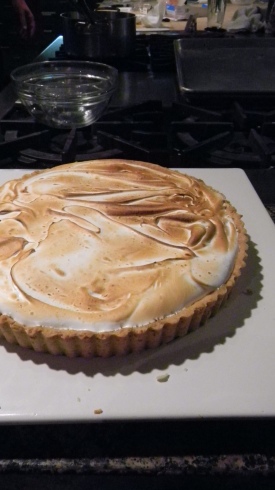
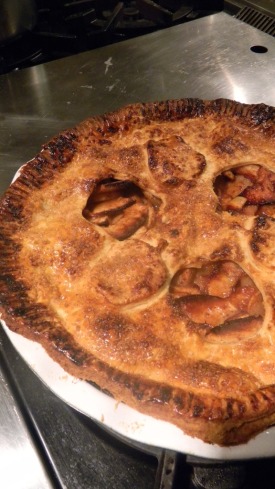
When I came in on Wednesday, the theme was “Pies and Tarts” so we – the 12 teens – made a banana cream pie with a Nutella Crust (delicious!), an all american apple pie, a chocolate pecan pie, and a lemon tart.

Chef Sarah putting the final "burn" on the lemon tart

Chef Sarah putting the final "burn" on the lemon tart

Lemon Tart

Lemon Tart - my student partner and I actually made this!

The Apple Pie

The Apple Pie - check out the cute apple cut-outs!

The Chocolate Pecan Pie

The Chocolate Pecan Pie - filled with toasted, nutty pecans and chocolate chunks

Even though the class was nice to take because we got to eat whatever we made, I think what I enjoyed the most was the quick baking lessons Sarah taught us.

On Wednesday, Sarah clarified the single difference between a pie and a tart, which is that a pie is meant to be served in the decorative pie ceramic/tin while a tart is meant to be served on a plate to show its decorative crust.

The second lesson of the day was between the different kinds of salts used in cooking and baking. The first shown to us was Kosher salt, which is what is primarily used in cooking because it does not have a very salty taste. This is why in cooking shows you’ll see the chef put in what seems to be a large amount of salt. Because Kosher salt is not as salty, the chef can put more of it in the dish.

The second salt was sea salt because it was going to be used in a chocolate chip cookie recipe the next day. This salt is often used in baking rather than cooking. The third salt was Morton’s iodized table salt – the salt that is in the salt shaker at a table. This is the saltiest of all the salts so it is only used in small amounts. Sarah then showed us flavored salts, flaky salts, and a block of pink salt. Who knew that there were so many kinds of salts?

Amazingly enough, when I went to check out the open house of the Art Institute in San Francisco, the chef had prepared a similar salt tasting.

Thursday, “Chocolate Overload”

On Thursday, the theme of the camp was “Chocolate Overload”. Simply by reading the name, I should have known what kind of overload I would be in for. But no, I barely considered what kind of overload would be presented to me when I arrived.

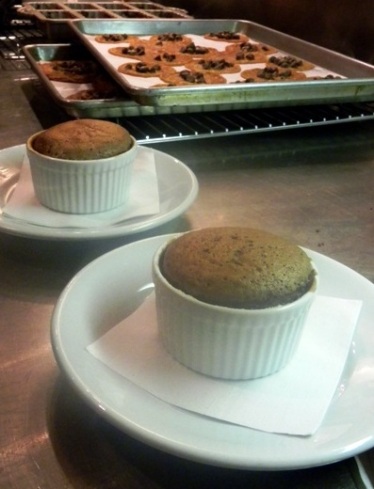
The recipes for the day included: Chocolate Chip Cookies with Sea Salt, Mini Chocolate Bundt Cakes with Ganache Glaze,  Chocolate Profiteroles with Vanilla Ice Cream, Chocolate Hazelnut Bread Pudding, and Chocolate Soufflés. That’s what I call an overload of chocolate.

Chocolate Souffles

Chocolate Souffles and Chocolate Chip Cookies (in background)

Chocolate Profiterolesand Chocolate Bundt Cake Slices

Chocolate Profiteroles and Chocolate Bundt Cake Slices - it's like a work of art with the light reflecting off the chocolate sauce!

Before any of the desserts were made, Sarah treated us to a mini chocolate tasting. Using E. Guittard chocolate, she gave each of us semi-sweet, bittersweet, milk chocolate, and white chocolate pieces. She explained the difference between all these kinds of chocolate, which is the ratio of  chocolate liquor to to cocoa butter. Best of all, she explained the whole chocolate process. I’ll repeat it here in case you don’t know how chocolate is made. :)

  1. The cocoa beans are taken from the cocoa plant pod and roasted in a large oven after being sorted out for quality. The roasting dries the bean to bring out the aroma and flavors.
  2. The cocoa beans are then cracked and the inside of the beans are broken into bits called cocoa nibs. These nibs taste just like chocolate except they’re extremely bitter. However, they are sometimes used to decorate the sides of a cake.
  3. The cocoa nibs are crushed and thickened into a paste called chocolate liquor – it has no alcohol! The cocoa nibs can also be made into cocoa liquor through a hydraulic machine that will separate the cocoa from the cocoa butter.
  4. The chocolate liquor is then mixed with different amounts of  cocoa butter according to the manufacture’s taste. Milk, vanilla, and sugar are added as well. To make white chocolate, one must only add these ingredients to the cocoa butter – leave out the chocolate and cocoa liquor.
  5. Finally, through a refining and tempering process, the chocolate is made to have the texture of the chocolate bars we know today.

And there you go! The chocolate process.

For more information on the chocolate making process, check out: How Chocolate Is Made

The last lesson in chocolate Sarah taught us was the difference between Dutch-processed cocoa and unprocessed cocoa, which is that Dutch-processed cocoa is treated with alkali to neutralize the chocolate’s acids. Again, I was happy to know that I was doing more than just baking with Sarah at Sur La Table; I was learning too!

Chocolate Tasting

Chocolate Tasting - the small little jars are chocolate at its different phases; the larger boxes are the types of finished chocolate.

Friday, “Cupcake Madness”

When I realized that Friday was “cupcake madness” I was not looking forward to it initially. I have had so many bad attempts at making cupcakes and then frosting them at home that I was not particularly excited about Friday’s class. Not even the recipes for the day really intrigued me except for the coconut raspberry cupcakes. The rest seemed medicore at best.

Oh, but boy was I wrong. (See, this is why I try to keep an open mind because the rare times that I don’t, I am always pleasantly surprised!)

Because of the small size of the class, I only worked with one other student and we got to bake TWO recipes instead of just one! My partner and I baked up the coconut raspberry cupcakes and the brownie cupcakes with peanut butter frosting. The rest of the groups made the red velvet cupcakes with cream cheese frosting (my second choice), caramel cupcakes with caramelized frosting,  and black and white cupcakes.
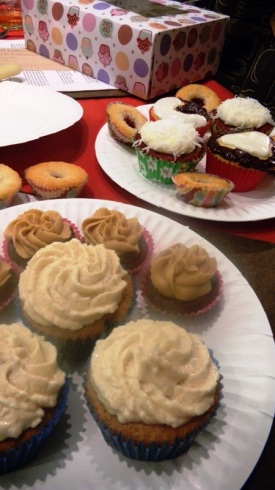
Cupcake Madness

Cupcake Madness - the big front three are caramel cupcakes; the front small minis are the brownie cupcakes with peanut butter frosting; the back are the coconut raspberry mini cupcakes, red velvet, and black and white cupcakes. These lasted my family and I a good three days to finish. My dad agreed on the superb taste. :)

I have to say that one of my favorites (with no bias!) was the coconut raspberry cupcakes because they had a distinct texture and taste. I had never tasted anything like it before so the mingling of raspberry and coconut was new to me. The caramel cupcakes were pretty good. I’m not much of a caramel fan so this could be why I didn’t find it that great. But it did taste like caramel and the frosting paired well with the cake part.

The brownie cupcakes with peanut butter frosting seemed to be an odd pair. I remember reading the recipe and thinking, “Really?”, but the peanut butter actually complemented the brownie. This combination worked well texture-ly because the peanut butter and brownie are both dense.

Another good reliable cupcake was the black and white  variety. I did not help make these cupcakes so I didn’t know what it would taste like but when I tasted it, I was very pleased. The white and black frosting on the top had a distinct sweetness like I had expected, but the cake itself was lemon so it cut through the sweetness and balanced it out. I’m not sure if you’re a lemon cake fan, but this was good. As of recently, I’ve begun to enjoy the taste of a lemon cake. Not of the lemon tart though because the liquidy lemon-ness of the tart was too much for me. But a lemon cake is beautiful.

Of the cupcakes, I did have a “first”.

Before Friday, I had never tried a red velvet cupcake. I know that sounds strange for a baker, but I’ve never actually tried one. The only red velvet cupcakes I had seen before were in Starbucks, but I never thought of buying on there because I didn’t want my first red velvet cupcake to be from Starbucks of all places (no offense to Starbuck fans).

The special ingredient of red velvet, as Sarah explained, is the addition of cocoa in it so basically a red velvet cupcake has  a hint of chocolate flavor in it but it colored red. Apparently, the new fad is blue velvet cupcakes, according to Sarah, but I have yet to see a blue version of this cupcake.

Trying the red velvet cupcake was an experience for me. I took a bite not knowing what to expect, but it was good. The subtle cocoa flavor does the trick with this cake. I can now say that I am a fan of red velvet cake. And this was my favorite of all the cupcakes. :)

Another small tip for making frosting and cupcakes different colors, use gel food coloring! It helps keep the shape of the batter.

So that has been my baking adventures so far. It had only been four days since I got back from Davis and I was already in the kitchen. In fact, the night I got home, I made a pound cake but it was from a box so that doesn’t really count. It’s nice to be back home, but I’m still missing my YSP friends.

"YSP" in frosting

I got a bit distracted and wrote "YSP" in frosting during the time we were waiting for the cupcakes to bake.

If you are interested in the recipes of any of the foods I mentioned above, send me an email/comment and I’ll be happy to send you the recipe. :)

‘Til next time ~

Rainy Adventure to San Francisco’s Ferry Building

24 Jan

Since my mom and I went to the Ferry Building two weeks ago, I could not wait to go back there again. When we first went, it was the Monday before school started back up again so there was no farmer’s market or arts & crafts tents. Plus it was mostly deserted. But, not this time.

This time there was the Walk for Life peace demonstration so the entire Embarcadero and Ferry Building area was jammed packed. The crowds were probably from the demonstration and because it was simply a Saturday. Weekends are when the farmers’ market and arts & crafts fair are set up and roaring to go. The rain did not prevent people from traveling to the Ferry Building either – it sure did not prevent us – it only forced all the crowds that would have been lounging outside into the building. It literally felt like walking through a New York subway! My head was spinning trying to take into the different sights, smells, and sounds.

Once inside and my head stopped spinning, I began to enjoy it. There were so many different kinds of people there: tourists (mostly Asian and Europeans), wet demonstrators, families with little kids and grandparents, and the young couples in their 20’s and 30’s. There were so many good smells coming from everywhere: the Ciao Bella gelatto place, Cowgirl Creamery’s Artisan Cheese Shop, San Francisco Fish Company, Farm Fresh to You, Far West Fungi, Stonehouse’s California Olive Oil, Imperial Tea Court, ACME Bread Company, Miette, and so much more. The whole directory can be found here.

I was actually surprised how busy and alive the Ferry Building was compared to the time we went there. The storekeepers of all the food shops were giving away samples like how Costco does. This one moment came when the flow of people stopped and across a couple of walking lanes I saw the Farm Fresh to You (grocery store). This older gentlemen with an apron on stood there next to a table with some kind of chocolate treats. He smiled and waved over my mom and I. It did not take much to attract us: it was simply the chocolate

.

Farm Fresh to You & CJ’s Bitz

CJ's Bitz: Hand Rolled in Toffee Chips (Original); sold at Farm Fresh to You

The grocer handed us a piece of toffee chocolate pretzel (the original flavor) and then when we smiled, nodded our heads that it was delicious, he handed us the peanut butter version which was the same thing but the pretzel was filled with peanut butter. As we stood there with our mouths glued shut with peanut butter, he proceeded to tell us about the white chocolate version with the peanut butter and without the peanut butter. Before we knew it, we agreed that the Original Flavor and the Peanut Butter Milk Chocolate versions were the best. And indeed, they were! Which is why we bought a small bag of each kind for $5.99 each, which is a $1 cheaper than their online price here.

After we left the Farm Fresh to You with their delicious organic fruits and vegetables, we headed outside equipped with umbrellas where the real produce stands were. Unfortunately, none of the pictures that I took came out well because of the rain, but I have to say that it was a nice variety. There were organic pastas, breads, vegetables from all over the Bay Area, and even a rotisserie chicken place!  This I got a picture of. (I am a big fan of rotisserie chicken, by the way. I always buy one at my local Lucky’s).


DELICA: A Japanese Delicatessen

After coming back inside to dry off, it was about 11:30 am so everyone was lining up at all the restaurants. We already knew that we wanted to go to DELICA – rf1, a Japanese Delicatessen. (On their sign, it reads more like “Deli CA”). They serve what the Japanese call “bentos”, which are basically like lunch combinations for a special price. The original Japanese bentos consist of rice, chicken, beef, or pork, seaweed, and fruit. It is much like a school child’s lunch.

They do serve various deli items such as Roast Beef sushi, Organic Agedashi (“ah-geh-dah-she”) Tofu Steak, and a Chicken Dumpling with Sweet Chili Sauce. Their salads are superb fusions of their original counter parts. I tried the Hijiki and Soybean Salad, Spicy Burdock Salad, and the Spinach and Sesame Salad. Their Carrot Ginger soup had a delicious taste and slightly thick texture. They had samples of this soup, which is why we bought a cup of it. They also have different sushis and fried items, but we did not try those. If you want the full menu (PDF), go here, or (HTML) here.

Here are the photos our lunch.

Hijiki Rice Ball & Salmon and Sesame Rice Ball - $2

Lunch Plate Combination Displays (Food displays are a typical Japanese custom)

Cold Cases of Deli Items and To Go Foods

Roast Beef Sushi in the Deli case; Tofu and Chicken Patties got cut off

My take-out box: spinach and seasme salad, Hijiki and Soybean Salad, and Tofu-Chicken Pattie with Miso Sauce

Mom's Take Out Box: Spicy Burdock Root Salad, Steamed Rice, and Chicken Dumpling with Sweet Chili Sauce

Chicken Dumpling with Sweet Chili Sauce

Carrot Ginger Soup

Lunch Time Music: Jazz, courtesy of the Man with the Oboe

I tried to get a picture of the little girl, but at the last moment, the woman with the stroller moved in the way. But, just look at everyone's smiles!

While we were enjoying a delicious meal from DELICA, my mom and I opted to sit outside where we were shaded by the roof. Surprisngly, there were still a good number of people seated at similar wire tables and chairs. The best part of the lunch and the view was the beautiful jazz music played by this man on his oboe.

I am not too sure if he was homeless or if he was just playing to play, but he was nonetheless talented. He seemed to be in his 50’s, but his heart was of pure gold. He was smile and laugh as little kids were captivated by his music. When in the presence of any little kid, he usually switched from his jazz tunes to children tunes like “Old McDonald” and “Twinkle, Twinkle, Little Star”. He even made one little boy who was crying so loudly to quiet down and actually giggle. I am sure that the parents of the little boy were so happy. Another little girl was so delighted with him and his music that she started dancing in front of him. Her parents stood by watching their daughter interact with the friendly man.

ACME Bread Company

Because I knew that I could not pass up trying the ACME Bread Company because it was reccomended by Mr. Peter Reinhart himself, we headed there next even though we were quite full from DELICA’s lunch. But, I did try to save room so I was able to squeeze in one of their Teeny Rolls, a palm-sized piece of bread.

It should not come as a shock to know that when we got there, there was a line forming. We quickly go into line and waited to step up to the counter where all the bread displays were. While waiting, I was watching the bread makers in the back punching the dough, rolling it out, and then using the super-sized, commercial ovens.

Once at the counter, I was dazzled by the different types of breads that they were selling. I couldn’t really choose which ones to buy, but somehow the words “onion bread”, “pumpkin bread”, and “three teeny rolls, please” came out. While walking around, we munched on a teeny roll. It was the best bread I have ever tasted. It was not like a sourdough or a sweet french roll. It was soft, moist like a cake but not sweet, with a hint of salt. I swear that it was just like dessert except that it was a piece of bread.

Sur La Table

Here’s just a quick area of where I ended up. (Predictable, aren’t I?)

Oh, and just for you who do not know what “Sur La Table” is, it is a cookingware and bakingware store. I’ve taken classes at the Sur La Table downtown. It’s a good place to go.

I saw this linen napkin and couldn’t help but smile when I saw it too …

The Wrap Up

If you go to San Francisco’s Ferry Building, then you have you try these places:

I did not write about all of them, but these are my personal favorites. Of course do not forget the Weekend Farmer’s Market.

So, if you ever come to San Francisco, come to the Ferry Building. It is a foodie’s heaven! It’s better than Disneyland. :)

A Savory Onion, Potato, Gruyere Galette

3 Aug

Recipe from Sur La Table; recipe also available on blog

I attended baking class at my local Sur La Table downtown. I’ve learned good tips about baking with cookies, pies, tarts, souffles, and just kitchen tips in general. One of the best things is that I got to keep all 25 recipes. :) The Onion, Potato, Gruyere (Cheese) Galette was a big hit at home so I decided I’d try to recreate the galette at home by myself (without the crew at the class). In case you don’t know what a galette is, a galette is a French pastry tart that can either be made sweet with fruit or savory for a dinner.

Here’s my result!


Here’s the recipe in case you wish to tackle it. You can also use your own high-quality pie dough from the store, but if you’re extra ambitious you use the following recipe for flaky, homemade pie/tart crust.

I know that there looks like there is a lot of directions to read, but it’s actually a lot easier than that. Don’t be intimidated!

Pie/Tart Crust Recipe

*Can be made up to 2 days ahead, cover with plastic wrap, and keep refrigerator.

Ingredients

  • 1 stick (4 ounces) cold unsalted butter, cut into 1/2 inch pieces
  • 3 to 4 tablespoons cold water (I ended up using more; you need just enough water to allow the flour and butter to come together to make a dough)
  • 1 1/4 cup (6 1/4 ounces) unbleached, all-purpose flour
  • 1 1/4 teaspoons sugar (omit for an savory crust; I forgot to do this and it turned out fine)
  • 1/4 teaspoon salt


Equipment: small measuring cup, pastry blender or food processor, large bowl rolling pin, pastry brush(/span>

Directions:


Potato, Onion, & Gruyere Galette Recipe

Ingredients:

  • 1 recipe Pie/Tart Dough (see above)
  • 1 1/4 tbs olive oil, plus 1 tbs for drizzling
  • 1 large onion (12 ounces), thinly sliced
  • 1/4 tsp finely chopped fresh thyme or rosemary (I used both)
  • 1/4 tsp plus 1 pinch kosher salt
  • black pepper
  • 4 ounces Gruyere cheese; coarsely grated
  • 1 lb red potatoes, washed (left unpeeled) and cut into 1/4-inch thick slices
  • 1 egg, lightly beaten

Equipment: rolling pin, baking sheet, parchement paper or a sillicone mat, medium saute pan large bowl, pastry brush, pairing knige, metal spatula, cooling rack, cake lifter or two metal spatulas, tart pan bottom, chef’s knife

Directions:

  1. Preheat oven to 400 degree Fahrenheit and position an oven rack in the lower third. Line the baking sheet with parchment paper or a silicone mat. Roll the dough out starting from the center outward while rotating the dough until the dough is circular and about 13 inches in diameter. Transfer to baking sheet and chill for 1 hour.
  2. Heat the 1/2 tbl olive oil in the medium saute pan over medium-high heat. Add the onion and cook, stirring occasionally, until soft and lightly colored, about 8 to 10 minutes. (It only took me 8 minutes). Stire in the thyme, 1/4 teaspoon salt, and 5 grinds pepper and blender well. Transfer to a plate and set aside to cool.
  3. Combine the cooled onion mixture, cheese, and potatoes in a large bowl. Mound the filling in the center of the chilled tart shell, leaving a 1.5 inch border at the edge. Fold that border up around the filling, pleating it to make a pretty enclosure and leaving the center open. Drizzle the filling with the remaining 1 tbp olive oil and sprinkle lightly with salt and 3 grinds of pepper. Lightly brush the pleated dough with the beaten egg to give it a shine and help it brown in the oven.
  4. Bake the galette for 45 to 50 minutes. (It took my galette only 45 minutes), or until the pastry is golden brown and the potatoes are soft when tested with a pairing knife or skewer. Use the metal spatula to life the edge of the galette sightly and check underneath to see if the bottom crust is a beautiful brown color. If so, transfer to a rack to cool for 5 to 10 minutes.
  5. Transfer galette to a serving plate with the cake lighter or 2 spatulas or tart pan bottom supporting the bottom as you move it. Slice with a chef’s knife and serve warm. If you like, serve with dollops of creme fraiche and spoonfuls of caviar.

Storing:
Store uncovered at room temperature for up to 6 hours, or cover with plastic wrap and refrigerator for up to days. Reheat in a 400 F for 10 to 15 minutes before serving.

I hope you enjoy! :)